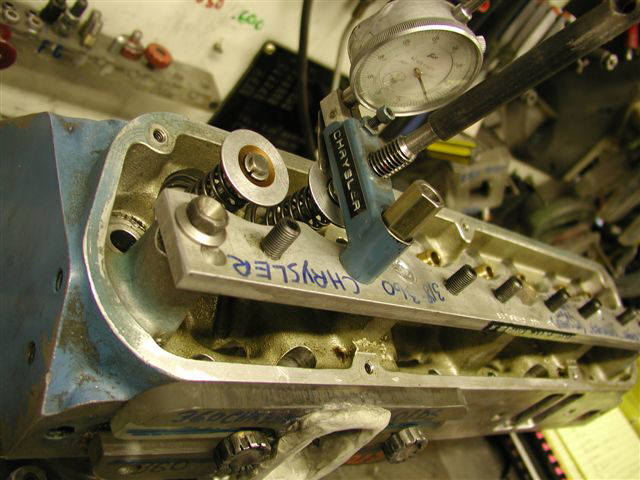
-When building the 360 Chrysler valve opening fixture I felt that I needed a plate with studs so that I could change from one cylinder to the next quick and easy.
-I had to notch the aluminum stud plate to clear the valve spring retainers because hit that plate at about .400" lift.
-the red dual valve opening fixture is for a big chief head----and since this requires about two of everything it would add about $55 to the initial price of $127-142.
the yellow C-clamps have been modified with round knobs instead of the loose "T" handle---and the underside of the clamps have a tendency to crack the plastic head perches so I install a rubber foot.
the yellow C-clamps have been modified with round knobs instead of the loose "T" handle---and the underside of the clamps have a tendency to crack the plastic head perches so I install a rubber foot.
-Then I machine away some of the weight and I shorten the screws.
-A pair of these are $50.

For 4 valve head I normally use four 1/4-20 all thread with large heavy thumb screws.
-Each turn of the screw is .050" so it's easy to mark the top with a marking pen as the screws are just touching the tips of the valves as shown---then rotate each screws two full rotations for each .100" valve lift.
-the tall knob in the center is a handle to a long threaded bar that screws into the sparkplug hole---to hold the fixture in place.
-To build this type of fixture usually requires that I have the head here so I can use it on the mill to get the thumbscrews holes directly in line with the valve guide bores.
-Price is about $140.
typical of my method of fabricating these tools.
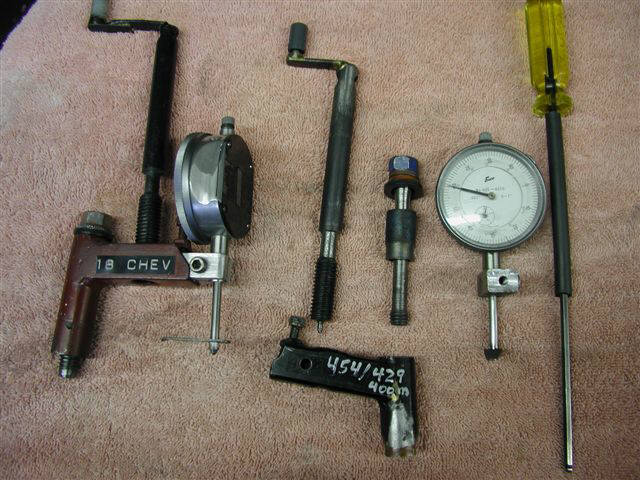
-General cost of these tool components to complete one complete setup are as follows:
$ 55 to 70-the
disassembled black 454 basic main body
$ 15-the long 7/16NC bolt with a machined 9/16" hex head & spacer.
$ 20-the 1" travel dial indicater.
$ 15-the aluminum mount that fits the dial indicator stem post.
$ 2-the small finger that bolts onto the dial indicator stem
$ 15-the "L" handle is made from a 1/2-13 bolt.
$ 5-for the 5/32" Bondus ball driver.
$127-142 is about what one complete tool of this type would cost---then you could use all those parts on any other main body
NOTES: 1-notice the side of the 18 chev dial indicator housing has been ground away---this is to clear a special lifting latch for an overhead trolley that I use to when lifting heavy heavy heads.
-I leave the latch in place during testing and it fits real close to the side of the indicator on certain applications.
2-the Bondus ball driver has a piece of vacuum hose upo onto the stem---this gives just a little quicker grip area when you are wanting to spin a screw in or out more than just a turn or so.
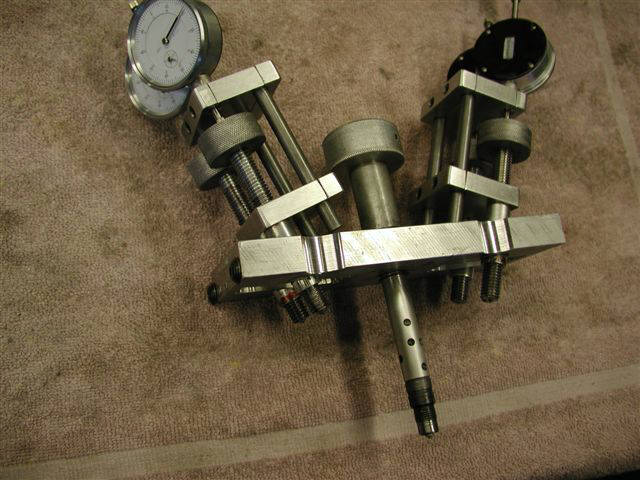
-This 4 valve fixture with the dial indicators is a lot more work and the addition of 4 dial indicators drives the price uo into the $450 range---but this is what Mike Chapman prefers.
-The dial indicators are so close to each other that the dials have to turned to the side so they clear each other.
-For some reason the two dial indicators on the right are facing the wrong direction in this photo.

A look down the bore hole of the head perch---showing the 8 vane impeller and the top of the little DC motor in the center that I use for my swirl meter.
-This also shows a piece of thin wall fibreglass tubing that I use to reduce the bore size.

-This shows the plastic head perch with a thick adapter plate for smaller bores.
-This has various bore sizes that protrude down to near the top of the swirl generator impeller.

-The generator motor inside the bore has a pair of wire that droop down and then plug up into the plastic so I can get the small electrical power signals outside to the alligater clips & wires and to the swirl meter mounted on the left soie of the flow bench.
The final photo shows the yellow tongs of a set of gauging pliers that I use to measure thin spots like where the valve spring pocket has been cut thru the roof of the 360 Dart BBC head.
-I make various sets of pliers like this to get into about any place like measuring pushrod wall thicknesses---divider wall headbolts hole thicknesses on SBC's etc.
-Some heads like SBC's with siamesed ports require having a "left" and "right" set of pliers to get in there and fit the mirrored images of the ports.


Bill Jones' Photo Gallery Page 5
Bill's Valve Opening Fixtures for Flowtesting